Linoleum flooring was once the darling of home design. Its durability and affordability made it a top choice for people looking to revamp their floors without breaking the bank. But let’s face it, linoleum flooring has seen better days.
It’s outdated, tacky, and an eyesore to anyone with a decent sense of style. How to replace linoleum flooring? That’s why we’re here today – to guide you through the process of replacing your worn-out linoleum flooring with something fresh and modern.
Don’t worry if you have no experience in DIY projects; this guide will take you through every step of the way. But first, let’s quickly go over what linoleum flooring is and why it might need to be replaced.
Linoleum is a type of flooring made from natural materials such as linseed oil, cork powder, and wood flour – but don’t let that fool you into thinking it’s eco-friendly. The manufacturing process requires a lot of energy and emits harmful gases into the atmosphere.
Aside from its environmental impact, linoleum flooring has several flaws that make it susceptible to damage over time. The surface can easily scratch or dent if heavy furniture is dragged across it or if sharp objects are dropped on it.
Additionally, moisture can cause linoleum tiles to warp or buckle. So now that we’ve established why you should replace your old-fashioned and worn-down linoleum floors let’s dive into a creative guide on how to do just that!
RELATED: From Grass to Mats: Choosing the Perfect Flooring for Your Rabbit’s Home
Preparing for Replacement
The Importance of Preparing the Space Before Beginning Any Work
Before you even think about starting to replace linoleum flooring, you need to prepare the space properly. Trust me, skipping this step will only lead to future headaches.
You’ll want to remove all furniture and other objects from the room, as well as any baseboards or molding that are in place. This will allow you to work more efficiently and avoid damaging anything during the replacement process.
You should also take care to protect any adjacent rooms from dust and debris. Cover doorways with plastic sheeting and tape it down securely, so no dust or debris can transfer throughout your home.
Additionally, if you have air vents in the room where you’re replacing linoleum flooring, cover them up with plastic sheeting too. This will prevent dust from getting into your HVAC system.
Tools and Materials Needed for This Project, Including Safety Equipment
Now that we’ve covered why preparing the space is important, let’s talk about what tools and materials you’ll need for this project. First things first: safety equipment! You’ll want to make sure you’re wearing a pair of gloves and protective eyewear throughout the whole process so that you don’t accidentally hurt yourself.
In addition to safety equipment, here are some other tools that might come in handy: – A heat gun (if your old linoleum flooring is being stubborn)
- A floor scraper (for removing adhesive)
- A putty knife (for removing small bits of adhesive)
- A utility knife (to cut new linoleum flooring)
- A measuring tape (to measure out how much new flooring is needed)
As far as materials go, here’s what you’ll need:
- Linoleum flooring
- Adhesive (if necessary; check with your manufacturer’s instructions)
- Underlayment (if necessary; check with your manufacturer’s instructions)
- Caulk (for sealing edges)
- Baseboards or molding (to replace any that you removed earlier)
Preparing the space and having the right tools and materials are crucial to successfully replacing linoleum flooring. Don’t skimp on these steps, or you’ll regret it later!
How to Replace Linoleum Flooring
Creative section: “Peeling Back the Layers”
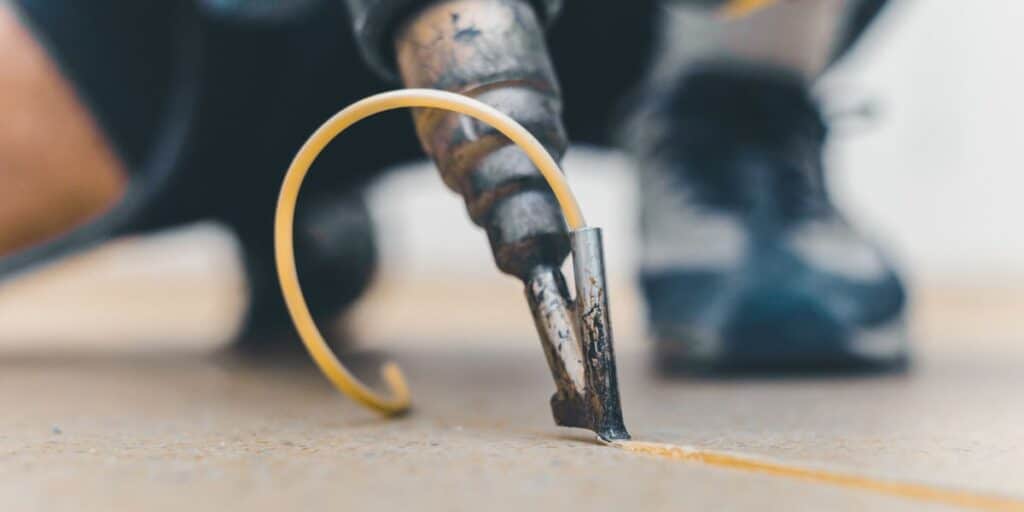
Let’s face it, removing old linoleum flooring is a tedious and often frustrating task. But fear not, my friends!
I have a creative and innovative solution for you – imagine you’re peeling back the layers of an onion. That’s right, just like an onion, linoleum flooring can be removed in layers.
Start by lifting up a corner of the linoleum with a putty knife or scraper. Once you’ve got a good grip on it, start pulling up the linoleum slowly and steadily.
As you pull, the top layer of the linoleum will start to come apart from the layer beneath it. Keep pulling until you’ve removed as much as possible.
Detail different methods for removing old linoleum flooring
If peeling back layers isn’t your thing, don’t worry – there are other options available to remove old linoleum flooring. One popular method is using a heat gun to soften the adhesive holding the flooring down. Simply hold the heat gun over a small section of the floor until you can lift it up with your scraper or putty knife.
Another option is using chemical strippers to dissolve the adhesive holding down your old linoleum flooring. Be careful when using these products, though – they can be dangerous if not used properly and may require proper ventilation.
Remember that no matter what method you choose for removing your old linoleum flooring, always wear appropriate safety gear, such as gloves and eye protection. And don’t forget that patience is key when tackling any home improvement project – take breaks when needed and don’t rush through any step of the process.
Removing old linoleum flooring may seem like an overwhelming task, but with these tips in mind, you’ll be well on your way to a successful replacement. Stay tuned for the next steps in our guide to replacing linoleum flooring!
Repairing Subflooring
Missed Opportunities
If you’re tearing up your linoleum flooring, you better take a peek at what’s underneath because you might just find a nasty surprise. Replacing linoleum flooring is the perfect opportunity to check and repair any damage to subflooring that may have gone unnoticed over time. Don’t miss this chance to make sure your floors are safe and secure for the long haul.
Inspecting Damage
Before diving in with the new flooring, spend some time inspecting the subfloor for damage. Start by looking for areas of rot or decay, which can occur from water damage or infestations.
Use a screwdriver to poke around any suspicious areas – if it sinks easily into the wood, that means it’s damaged. Take note of where the damage is located so you can make repairs before moving on.
Making Repairs
Once you’ve identified any damaged areas, it’s time to make repairs. First, remove any damaged wood using a circular saw or reciprocating saw. Then cut a replacement piece of plywood to fit snugly into the space and secure it in place with screws or nails.
Use wood filler or putty to smooth out any gaps or cracks in between boards and sand down until flush with surrounding floorboards. Don’t neglect this crucial step of repairing subflooring when replacing linoleum flooring – not only will it help prevent future issues like warped floors or weakened support structures, but ensure that your new floors look their best for years to come!
Measuring and Cutting New Flooring
Creative section: “Cutting Corners”
If you think measuring and cutting new linoleum flooring is a breeze, then you must be living in a dreamland. The reality is even the most experienced DIY enthusiast can encounter some bumps in the road when it comes to this task.
But fear not! I am here to provide you with some tips and tricks for measuring and cutting new linoleum flooring like a pro.
Accurately Measuring the Space
Measuring the space accurately is crucial when replacing your old linoleum flooring. The last thing you want is to fall short of your measurements and end up with gaps or overlaps between planks. Trust me; it’s not a good look.
To avoid any mishaps, start by finding the center point of your room using a tape measure. From there, measure outwards towards each wall, making sure to mark down all measurements on paper as you go along.
Ensure that you account for any nooks or corners in the room, taking into consideration that these areas may require special cuts. It’s also important to measure around any permanent fixtures in the room, such as toilets or sinks, as these will need to be taken into account when purchasing your new linoleum flooring.
Cutting Like a Pro
Now that you have accurate measurements of your space, it’s time to cut your linoleum flooring like a pro. When it comes to cutting around corners or nooks, don’t be afraid to use special techniques such as tracing templates onto your material before making cuts – this will help ensure an accurate fit and save time in the long run.
Additionally, always use sharp blades when cutting through linoleum flooring – dull blades will only lead to uneven cuts that take longer than necessary. If possible, invest in a cutting tool designed specifically for linoleum flooring, as this will help ensure a clean and precise cut every time.
Cutting new linoleum flooring is not rocket science, but it does require some skills and careful planning. By following the tips and tricks outlined above, you can avoid costly mistakes and ensure that your new flooring looks sleek and professional.
RELATED: How Much Do You Tip Floor Installers?
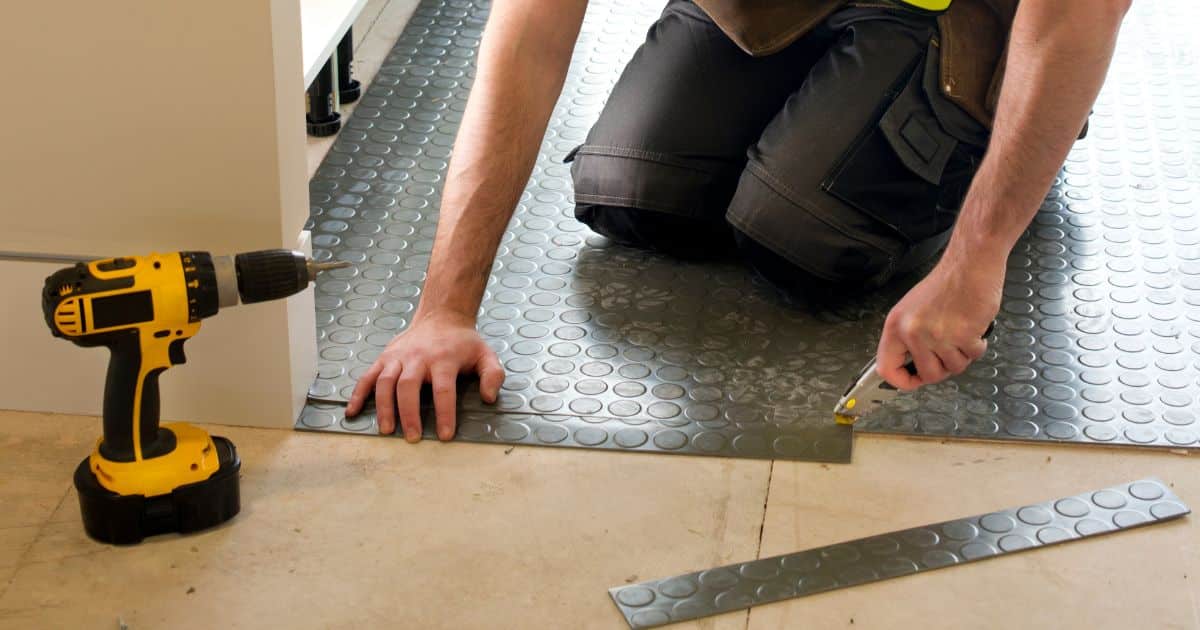
Installing New Flooring
Insinuate that installing new linoleum is NOT a job for the faint of heart
Installing new linoleum flooring is a big undertaking, and it should not be taken lightly. While there are many people out there who believe that they can easily tackle this project on their own, the truth of the matter is that it requires a great deal of skill, knowledge, and experience. If you are not confident in your abilities to install new linoleum flooring properly, then you should seriously consider hiring a professional to do the work for you.
Detail how time-consuming installing new linoleum can be
It’s important to understand that installing new linoleum flooring is not something that can be done quickly or easily. This type of project requires a significant amount of time and patience, as well as careful attention to detail.
Even if you have experience with DIY projects around the house, you may find that installing new linoleum takes longer than you expected. You’ll need to spend time measuring and cutting the material accurately, preparing the subflooring properly, and ensuring that everything is in place before moving on to the next step.
Explain how rewarding it can be when done correctly
Despite all of these challenges and difficulties, there’s no denying that installing new linoleum flooring can also be incredibly rewarding. When done correctly, this project can transform your home in a truly amazing way.
Not only will your floors look brand-new once again, but they also feel like stepping on clouds underfoot! You’ll gain satisfaction from knowing that you did the work yourself as well, which provides an added layer of pride in ownership.
Frequently Asked Questions
Is it easy to replace linoleum flooring?
Replacing linoleum flooring can be relatively easy, especially if the existing linoleum is in good condition and properly adhered to. However, it may require some preparation work, such as removing the old flooring and ensuring a smooth and clean subfloor.
What can I replace linoleum floors with?
Linoleum floors can be replaced with various flooring options, including vinyl, laminate, hardwood, or tile, depending on personal preference, budget, and the specific requirements of the space.
Is replacing linoleum hard?
The difficulty of replacing linoleum flooring can vary depending on factors such as the condition of the existing floor, the size of the area, and the chosen replacement material. In general, with proper preparation and basic DIY skills, it is possible to complete a linoleum replacement project.
How do you replace a damaged linoleum floor?
To replace a damaged linoleum floor, the first step is to remove the damaged section by cutting it out carefully. Then, the subfloor needs to be prepared, and the new linoleum or alternative flooring material can be installed using appropriate adhesives or installation methods.
Can I put linoleum over old linoleum?
While it is technically possible to install linoleum over old linoleum, it is generally not recommended. The existing linoleum may not provide a stable base, and the new installation can result in an uneven or compromised flooring surface. It is usually better to remove the old linoleum before installing new flooring.
What is the disadvantage of linoleum flooring?
A disadvantage of linoleum flooring is that it can be susceptible to scratches and dents, especially in high-traffic areas. Additionally, linoleum may require regular maintenance and occasional sealing to protect it from moisture and maintain its appearance.
Conclusion
Replacing your old worn-out linoleum may seem like an overwhelming task at first glance, but with diligence, patience, and attention to detail, it can be done. The process will take time, but the end result is well worth the effort.
Whether you decide to take on the project yourself or hire a professional, remember that proper planning and preparation are key to success. Take pride in ownership of your home by installing new linoleum flooring in a manner that does justice to your investment and hard work!