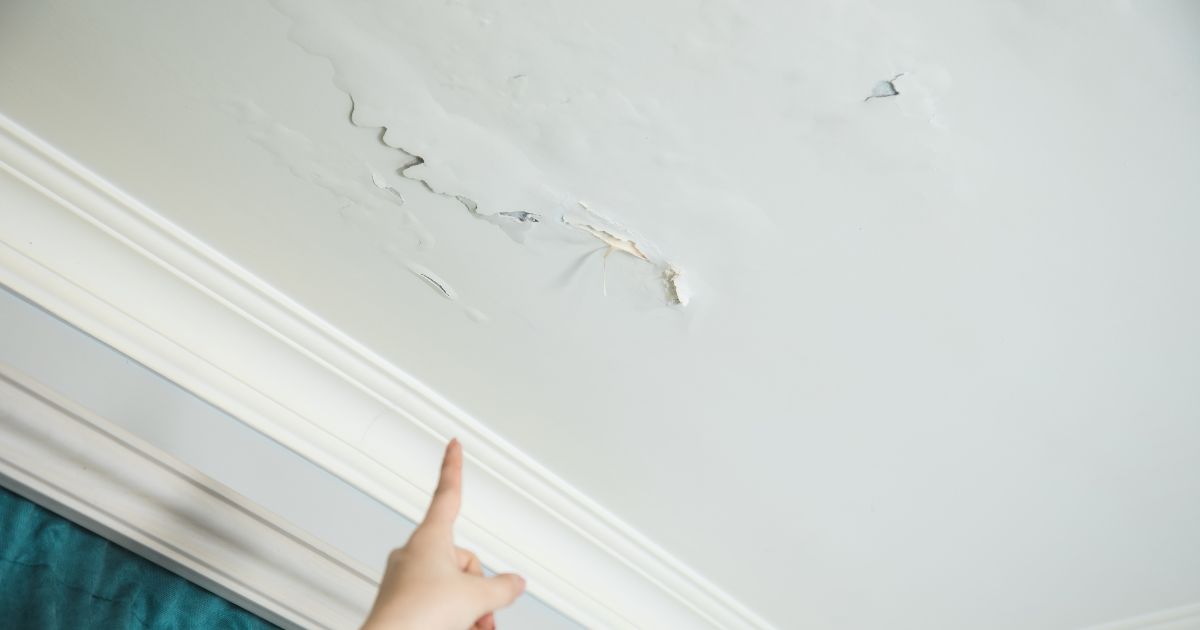
The Importance of Repairing Drywall Cracks in Ceiling
Ceiling cracks are the bane of any homeowner’s existence. Not only do they ruin the aesthetic of a room, but they also signal deeper structural issues that could compromise your safety and well-being. But despite these dangers, many people choose to ignore ceiling cracks, leaving them to worsen over time.
As an expert in DIY ceiling drywall crack repair, I can tell you that this is a grave mistake. Neglecting ceiling cracks not only leaves your home vulnerable to pests and mold, but it can also put you at risk of injury if a section of drywall were to fall on you or your loved ones.
Learn how to repair drywall cracks in ceiling with this step-by-step guide. Get your home looking like new again!
Brief Overview of the Repair Process
Repairing cracks in overhead drywall may seem daunting at first glance, but with the right tools and techniques, it’s entirely possible for even a novice DIY-er to restore their ceiling’s integrity. The process involves assessing the damage done by the crack(s), gathering necessary materials such as mesh tape and joint compound, preparing the area around the crack(s) for repair by clearing debris and applying primer, then filling and taping up small or large cracks using spackling paste or new pieces of drywall respectively.
One must sand and smooth out surfaces before painting over them. Now that we’ve got an overview, let’s dive deeper into understanding why it is important to fix these pesky little nuisances called ceiling drywall cracks.
Assessing the Damage
Identifying the type of crack:
Before starting any ceiling crack repair project, it is essential to identify the type of crack present. Two primary types of cracks are common in ceiling drywall – vertical and horizontal cracks. Vertical cracks commonly occur due to settling or normal wear and tear over time, while horizontal cracks can be a sign of more serious structural issues.
To identify whether it is a vertical or horizontal crack, you need to observe the direction in which the crack runs. A vertical crack runs from the top to bottom, while a horizontal crack runs parallel to the ground.
Determining the cause of the crack:
It is crucial to find out what caused this problem before beginning any ceiling drywall repair work. Without identifying and fixing the underlying cause, your fix will only be temporary. Several factors could be responsible for causing ceiling drywall cracks; some include water damage, improper installation methods, too much weight on an unsupported section of the ceiling, or even natural settling over time.
One way to determine if water damage has caused your drywall’s issue is by checking if there are signs of moisture on or near that area. If you see signs such as water stains or detect a musty odor from mold growing in that area’s vicinity, it may be best first to resolve water damage before repairing any cracks.
Tips for restoring ceiling drywall cracks:
1) Do not ignore minor damages
2) Identify whether you want a DIY solution or hire professionals
3) Check for moisture content in case there are signs of water damage
4) Safety should always come first when working at heights
5) Understand that fixing these problems can be time-consuming Steps for repairing cracks in ceiling drywall may seem simple enough at first glance but can quickly become more challenging if not done correctly.
Preventive measures for ceiling drywall cracks:
It is always better to prevent damage than to repair it. Here are some tips on how to prevent future ceiling drywall cracks:
1) Proper installation methods
2) Regular inspections and maintenance
3) Avoiding overloading or misusing the area above the ceiling.
4) Use high-quality construction materials
5) Repair any damages as soon as they occur.
Identifying and fixing the cause of your ceiling drywall crack is critical before starting any repairs. By following these tips, you can ensure that your fix lasts longer and prevents future issues.
Gathering Materials
Tools needed for repair
When it comes to repairing ceiling drywall cracks, you need to have the right tools. A lack of preparation can make this home project a disaster.
You will need a utility knife, sandpaper, paintbrushes, dust mask, goggles, and a drywall saw or rotary cutting tool. The utility knife is essential for cutting the mesh tape and trimming pieces of drywall.
Make sure it is sharp enough to cut through the tape and drywall with ease. Sandpaper is used for smoothing out rough edges and any excess compound after patching your ceiling.
Wearing a dust mask and goggles are crucial safety measures when repairing drywall cracks in ceilings. Drywall dust can be hazardous if inhaled or gets into your eyes.
Types of drywall tape and joint compound
There are different types of drywall tapes available on the market today that you should consider when fixing cracks in your ceiling’s drywall. The two most commonly used types of tape are paper tape and mesh tape.
Paper tape is useful when dealing with new constructions or larger areas needing repair. It provides strength during expansion and contraction while keeping joints from cracking over time.
Mesh tape, on the other hand, works best for smaller repairs as it doesn’t require as much strength as paper tape does. Its primary function is to cover small holes without becoming visible after paint touch-ups after repairing ceiling cracks.
In addition to choosing your type of tape, you also need joint compound or what is also commonly referred to as mud. When it comes to selecting your mud type, there are two kinds: quick-setting mud and pre-mixed mud.
Quick-setting mud has faster drying times than pre-mixed while pre-mixed mud has already been mixed with water so that you can apply it right away without mixing yourself first. ; don’t go into repairing ceiling drywall cracks without the appropriate tools and materials.
Choosing the right tape and mud is essential to ensure your repair job lasts for years to come. Don’t know what to use?
Look for advice online or at your local home improvement store’s customer service center. Remember, when it comes to DIY ceiling drywall crack repair, preparation is key!
Preparing the Area
Clearing debris from the area: Don’t Skip This Step!
Before starting to repair your ceiling drywall cracks, make sure you clear the damaged area of all debris. You don’t want to leave any remnants of the old drywall or chunks of paint, as they can interfere with the adhesive properties of your new materials.
Plus, it just doesn’t look professional if there is a pile of mess surrounding your beautiful repair job. Ensure that you have a sturdy stepladder or platform to reach up and clear away any debris.
Use a dry brush or vacuum cleaner with a long hose attachment to carefully remove any loose bits if you find pieces that are still attached but hanging by a thread, do not pull them off aggressively, as it may cause further damage.
Applying primer to the damaged area: Prep Is Key
Once you’ve cleaned up all debris, it’s time to prime! I know some DIY enthusiasts might skip this step because they believe they can save some money by using less material, but trust me, this is one part where cutting corners won’t do you any favors.
Priming prepares the surface for better adhesion and ensures that your patchwork blends seamlessly into your existing ceiling texture. Plus, it seals any unevenness caused by sanding so that when it’s time to apply touch-up paint, you get an even finish without blotches.
Use an oil-based primer as it dries faster and provides better coverage than water-based primers. Apply with a roller brush in thin coats until the entire damaged area is covered.
Tips for restoring ceiling drywall cracks:
- Be thorough when clearing debris
- Use an oil-based primer
- Apply thin coats. Preventive measures for ceiling drywall cracks
- Avoid overloading shelves or hanging heavy objects on the ceiling
- Check your attic for any signs of moisture damage that might be affecting your ceiling
Repairing Small Cracks
Applying Mesh Tape to the Crack: Why It’s a Must-Have
Before we get started on fixing small ceiling cracks, let me tell you that simply spackling over them is a rookie mistake. The crack will reappear faster than you can say “DIY ceiling drywall crack repair.” Best practices for fixing cracks in the ceiling require you to apply mesh tape over it first. Now, I know some of you might be thinking, “What’s the point of adding this extra step? It’s just one small crack.” But let me tell you, my friends, this technique has saved me from countless headaches in the long run.
The mesh tape reinforces the joint compound that comes next and ensures that it won’t crack again anytime soon. To apply mesh tape properly, cut a strip slightly longer than the length of the crack.
Secure one end with your non-dominant hand while smoothing down with your dominant hand along its length. Make sure there are no air pockets or creases as they’ll hinder your subsequent work.
Spackling Over Mesh Tape: How It Works
Once you’ve applied mesh tape over your small ceiling crack, it’s time to cover it with joint compound or spackle. Spackling is easy enough – just use a putty knife or trowel to spread an even layer over the mesh tape until it blends in perfectly with your ceiling finish. However, don’t be tempted to pile on too thickly, as this can lead to shrinkage when drying and even cause more cracks down the line.
Instead, use multiple thin layers and sand between each coat for a smooth finish. Some people prefer using premixed joint compounds as opposed to traditional powder forms because they’re easier to work with and don’t require mixing – but at what cost?
They might offer convenience, but they’re also much more expensive. In my experience, traditional powder forms are just as easy to use and much cheaper in the long run.
So, there you have it – the best techniques to repair cracks in overhead drywall. Trust me when I say that if you follow these steps for repairing cracks in the ceiling drywall, you won’t regret it.
Repairing Large Cracks
Cutting out the damaged area with a drywall saw
When it comes to repairing large cracks in your ceiling, sometimes the best solution is to cut out the damaged area completely and replace it with a new piece of drywall. This method may sound extreme, but trust me when I say that it will save you time and headaches in the long run.
First things first, before you start cutting into your ceiling like a madman, make sure you’ve identified the cause of the crack and have taken any necessary preventive measures to avoid future damage. Once you’re ready to proceed, use a drywall saw to carefully cut out the damaged area in a shape that will allow for easy replacement.
Be careful not to cut too far into surrounding areas or joists; otherwise, you’ll end up with an even bigger repair job on your hands. Make sure the edges of your cut are clean and square so that they will fit snugly against your replacement piece.
If you’re not comfortable with using power tools or don’t have access to drywall saw, this may be a job best left for professional contractors. But if you’re feeling confident in your DIY skills (and why wouldn’t you be?), then keep reading for tips on how to replace the damaged section of drywall.
Replacing with a new piece of drywall
The next step is to cut a new section of drywall that fits snugly into the hole left by your previous cut. Measure twice before making any cuts so that you can be sure everything lines up properly once it’s installed. You’ll need screws or nails (depending on whether your ceiling is attached to wood or metal framing) to secure the new piece in place.
Use enough fasteners to ensure that the drywall is held firmly against the framing members. Once your new piece is securely fastened, it’s time for the fun part: taping and mudding the seams.
Taping and mudding seams
Taping and mudding are two of the most important steps in restoring drywall integrity in your ceiling. If you don’t do these steps correctly, you’ll end up with unsightly bumps and ridges that will be impossible to hide under the paint. Start by applying a strip of drywall tape over the seam where your new piece of drywall meets the surrounding ceiling.
Be sure to press down firmly on both sides of the tape so that it adheres well to both surfaces. Next, use a putty knife or trowel to apply joint compound (also known as “mud”) over the tape.
This will fill in any gaps between your new piece of drywall and the surrounding surface. Be careful not to apply too much mud at once; this can lead to long drying times and cracking once it dries.
Instead, apply multiple thin coats of mud, allowing each coat to dry completely before adding another layer. Once you’ve applied several coats of mud and are happy with how smooth everything looks, give it all a final sanding job before priming and painting over your repaired area.
Congratulations! You’ve successfully repaired a large crack in your ceiling using just a few simple tools and techniques!
Finishing Touches
Sanding and Smoothing Surface – The Devil is in the Details
Now that you’ve applied the spackling compound let’s talk details. Sanding is by far the most important part of this process.
You may be tempted to rush through it, but don’t! Trust me, your patience will be rewarded when you see the final result.
Grab a sanding block and start with 120-grit sandpaper, then move on to 220-grit for a smoother finish. Make sure you’re not leaving any lumps or bumps behind – ceiling drywall crack repair requires precision.
If you’re having trouble smoothing out rough spots, try using an electric sander. But beware: it’s easy to overdo it with the power tool and end up creating new problems – namely, scratches on your fresh coat of spackle.
So proceed with caution! Remember: taking your time while sanding will make all the difference in achieving a polished finish.
Painting Over Repaired Area – Don’t Be Lazy!
Assuming everything has gone according to plan and your ceiling looks good as new again – congratulations! But wait… before you call it did and move on with your life, there’s still one more essential step: paint touch-up. I know what you’re thinking – “I don’t need to paint over that small area I just fixed.” Wrong!
Painting over repaired ceiling drywall cracks is crucial for achieving a seamless look that blends in with the rest of the ceiling. So grab some paint that matches your existing ceiling color and get to work!
If your paint job isn’t up to par, everyone will notice those pesky little cracks no matter how well they were repaired. A word of advice: use a brush instead of a roller for touch-ups since brushes provide better control of the paint and can help you avoid drips or splatters.
Remember: don’t be lazy when it comes to painting over your repaired area. A lackluster paint job will ruin all of your hard work.
But Wait, There’s More
At this point, you’ve done a great job repairing the crack in your ceiling drywall. But before you step down from that ladder and call it quits, take a good look at your handiwork and make sure everything is perfect. Re-check that there are no lumps or bumps left on the surface that need sanding.
Make sure any excess spackle is gone and everything is smooth to the touch. If you’re satisfied with your repair job, then congratulations!
You’ve successfully restored drywall integrity in the ceiling. But remember, even though you’ve repaired the immediate issue, there may be underlying causes for those cracks that need addressing – so consider preventive measures for ceiling drywall cracks to ward off future issues.
Repairing cracks in overhead drywall isn’t rocket science – but it does require patience and attention to detail. With some steady hands and a little know-how from this article on how to repair drywall cracks in the ceiling – you’ll have those pesky cracks fixed up in no time!
Preventative Measures
Ceiling drywall crack causes
To avoid future ceiling drywall cracks, you must first know what causes them. Structural shifting and settling, seasonal temperature changes, and moisture fluctuations are just a few culprits that can cause cracks to form in your ceiling. Understanding the reasons why your ceiling is cracking will help you take preventive measures to stop it from happening again.
Tips for restoring ceiling drywall cracks
The key to preventing future ceiling drywall cracks is to restore the integrity of your ceiling. This means making sure all underlying issues are fixed before attempting any repairs. Before applying any tape or joint compound, make sure that the surface where the repair will take place is completely dry and free of dust or debris.
This will ensure better adhesion of joint compound and tape. Also, consider investing in high-quality paint with elastomeric properties when touching up the repaired area.
Mudding and sanding ceiling drywall cracks
When mudding over a crack in your ceiling’s drywall, be careful not to apply too much mud at once, as this can cause it to sag or crack under its own weight. Instead, apply several thin layers allowing each one to fully dry before adding more. Sand between each layer using fine-grit sandpaper until smooth.
Repair techniques for ceiling drywall cracks
There are many different techniques for repairing ceiling drywall cracks but keeping them from reappearing can be a challenge. One effective way to prevent future cracks is by using fiberglass mesh tape instead of paper joint tape. Fiberglass mesh has greater elasticity than paper tape which makes it less likely to crack over time.
Patching and filling overhead drywall cracks
One common cause of overhead drywall cracking is moisture buildup between insulation and drywall. To prevent this, be sure to maintain proper ventilation in your home and keep the area free from moisture.
If you are dealing with a crack in your ceiling caused by moisture, consider installing a vent fan to help control humidity levels. Repairing ceiling drywall cracks is a time-consuming process that requires patience and attention to detail.
However, taking preventive measures can help you avoid having to repair them altogether. By understanding what causes ceiling cracks and following these tips for restoring drywall integrity in the ceiling, you can ensure your repairs last longer and prevent future damage from occurring.
Frequently Asked Questions
Is it normal for ceilings to crack?
Minor hairline cracks in ceilings can be considered normal due to the natural settling and movement of a building. However, significant or recurring cracks should be assessed by a professional to determine the underlying cause and potential structural implications.
Can you just paint over ceiling cracks?
Painting over ceiling cracks is not a recommended solution. It is important to address the underlying cause of the cracks, repair the damaged area using joint compound or drywall mud, and ensure a smooth and seamless finish before considering painting.
Why is my ceiling drywall cracking?
Ceiling drywall can crack due to various reasons, including structural movement, settling of the building, temperature and humidity fluctuations, improper installation, moisture or water damage, or the natural aging of materials. Identifying the specific cause is crucial for effective repair and prevention.
What kind of tape do you use for cracks?
For cracks in ceilings, it is common to use self-adhesive fiberglass mesh tape or paper drywall tape. Fiberglass mesh tape is often recommended for its added strength and resistance to cracking compared to paper tape.
How do I know if my ceiling cracks are serious?
Signs that ceiling cracks may be serious include cracks wider than 1/8 inch, long or diagonal cracks, recurring cracks, sagging or bulging of the ceiling, or cracks accompanied by other structural issues. Consulting a professional for a thorough assessment is advisable to determine the severity and appropriate course of action.
Do ceiling cracks get worse?
Ceiling cracks can potentially worsen if the underlying cause is not addressed. Factors such as ongoing structural movement, moisture issues, or inadequate repairs can contribute to the progression of cracks. Timely identification and proper repair are crucial to prevent further damage.
Conclusion
Fixing cracks in ceiling drywall can be a daunting task, but with the right tools and techniques, it is a manageable DIY project. Identifying the type of crack and its cause is crucial to selecting the proper repair method.
Gathering materials beforehand and preparing the area will make for a smoother process. Smaller cracks can be filled with spackle and mesh tape, while larger cracks require the replacement of damaged drywall.
Sanding, smoothing, and painting are essential finishing touches to make repairs look seamless. Preventative measures such as monitoring humidity levels, insulation installation, or even hiring a professional inspector should also be taken into consideration.