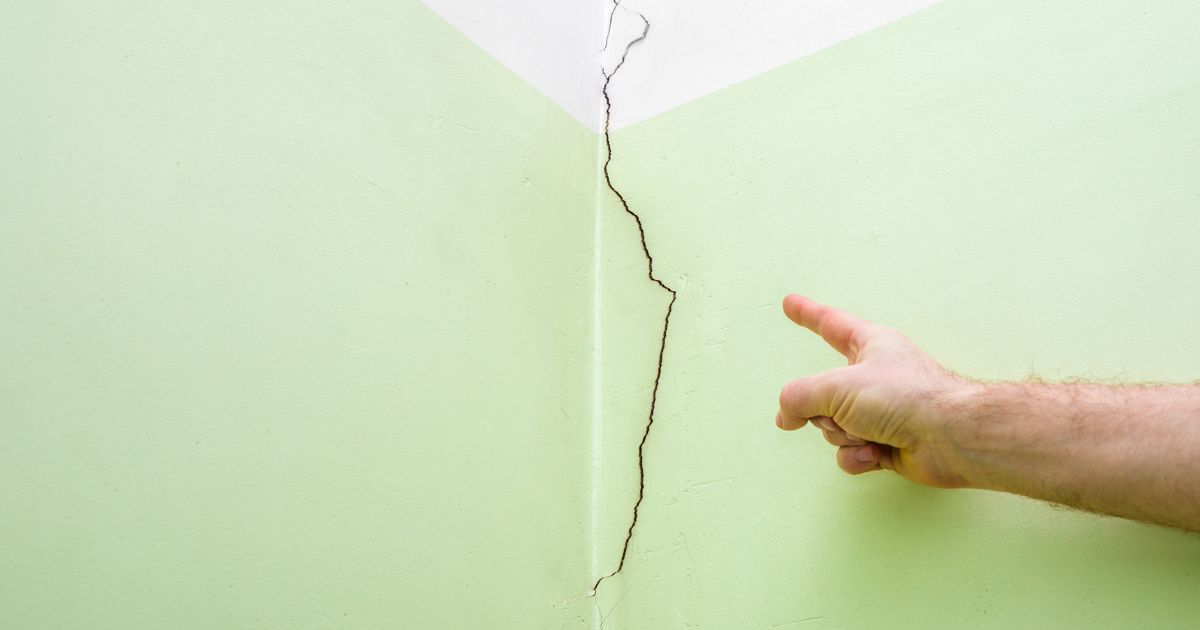
The Importance of Maintaining the Integrity of Drywall Corners
Drywall is a crucial component of any home or building’s structure, providing a finished surface that is both durable and aesthetically pleasing. However, when cracks start to form in the corners where two walls meet, it can compromise the integrity of the entire structure.
That’s why it’s essential to take care of these problems as soon as they arise. Ignoring drywall corner cracks can lead to more severe structural issues down the line.
Moisture can seep into these cracks and cause mold or mildew to grow, which can weaken the drywall and even spread throughout your home. Additionally, if not addressed promptly, small cracks can quickly turn into large ones that require expensive repairs.
Learn how to repair drywall cracks in corners with this step-by-step guide. Protect your home’s integrity and prevent future damage.
Common Causes of Drywall Cracks in Corners
There are several reasons why drywall corner cracks occur. One common cause is settling. As your home ages, it may shift slightly due to changes in weather or soil conditions.
Over time, this movement puts stress on the walls and joints between them, leading to small cracks. Another cause of drywall corner cracks is poor installation techniques.
If someone does not use enough screws or adhesive during installation, the walls may lack stability and begin cracking at the corners over time. Extreme weather conditions such as heat waves or prolonged periods of humidity can affect the integrity of your drywall and lead to cracking.
Regardless of what caused your drywall corner crack(s), it’s important to address them promptly before they become more extensive issues that require substantial repairs. : Don’t underestimate how crucial maintaining drywalls’ integrity (especially its corners) can be for long-term housing safety.
Corner crack problems always have a reason behind them; hence understanding their causes could help prevent similar future issues. Stay tuned for the next section on how to assess the damage of your corner crack(s) and determine if additional repairs are necessary.
Assessing the Damage
Identifying the type and severity of the crack
Restoring drywall corner cracks can be a nightmare for homeowners. Some homeowners use DIY techniques to fix these cracks in corners using cheap materials, but they only make things worse.
It’s important to identify the type and severity of the crack before repairing it. The most common types of drywall corner cracks are hairline, slightly visible, and significant.
Hairline cracks are barely visible, while slightly visible cracks have developed wider gaps between them. Significant cracks are those that have caused structural damage to the underlying framing or foundation.
To properly identify the type of crack, you’ll need to check for movement or flexibility in surrounding areas. Also, look out for any bulging or curving around corners.
Determining if additional repairs are needed
Best practices for fixing cracks in drywall corners require proper assessment before proceeding with repairs. You may need to do additional repairs depending on the type and severity of the crack identified in step one.
If you’ve identified that significant cracking has occurred due to structural damage from corner cracks, then additional repair work may be necessary before proceeding with drywall restoration. Alternatively, if there is no significant cracking or structural damage found after assessing your walls’ condition using an inspection camera (commonly found on smartphones), patching and sanding corner cracks should fix most issues.
If you’re unsure about whether additional repair work is required or not, it’s best to consult a professional who can provide guidance on how best to proceed with fixing your wall corners. Tips for Restoring Cracks in Drywall Corners
Before proceeding with repairing tape joints in corner walls using mud compound after filling cracks in inside corners:
- Ensure that all loose debris has been removed from cracked areas
- Apply joint tape as an added layer of protection
- Let joint compound dry overnight before sanding or painting to avoid any issues with texture matching
- Use a high-quality primer to prevent paint from peeling or flaking off in the future. Patching and sanding corner cracks should be enough for most hairline cracks.
However, if you haven’t fixed the underlying cause of the crack, it’s only a matter of time before it recurs. By taking the time to assess your walls properly and determine if additional repairs are necessary, you can ensure that your drywall restoration is both effective and long-lasting.
Preparing for Repair
Gathering necessary tools and materials: The key to success
Before starting any drywall corner crack restoration, it is essential to have the right tools and materials at hand. Don’t just start the project with half-baked supplies, or you’ll be left scratching your head midway through.
Best practices for fixing cracks in drywall corners include several basic tools such as a measuring tape, screwdriver, sandpaper, utility knife, joint compound, and drywall tape. Depending on the extent of damage, specific tools like a drill or oscillating tool may also be required.
In addition to these items, always have spare sandpaper sheets and brushes ready for use during the patching process. Make sure your drywall corner crack restoration kit is fully stocked before beginning repairs.
Protecting surrounding areas from dust and debris: An ounce of prevention
Repairing cracks in inside corners can create an excessive amount of dust and debris that can damage your furnishings or floors if not adequately contained. Therefore, it is essential to practice proper preventative measures before starting any work.
Begin by covering floors with drop cloths or plastic sheeting; this will prevent dust from settling on surfaces. Don’t forget to cover air vents, too; you don’t want the dust spreading throughout your home’s HVAC system after all!
Use painter’s tape adhesive around edges when taping off areas that need protection from joint compound splatter. Once you’ve finished appropriately protecting everything you don’t want to be affected by structural damage from corner cracks, repair work begins!
Be sure to take care when moving around so as not to cause unnecessary messes while working in tight spaces where one wrong move could undo hours’ worth of effort. Never underestimate the importance of preparing before any major renovation project – especially when it comes to repairing cracks in inside corners!
Gather all necessary materials beforehand and take adequate measures to protect your home from dust and debris. By doing so, you’ll ensure a smoother, more efficient repair process while minimizing any potential damage to surrounding areas.
Filling the Crack
Choosing the Appropriate Filling Material: The Key to Success
One of the most critical aspects of DIY corner drywall crack repair is choosing the correct filling material. There are numerous options available, including spackling paste, joint compound, and patching plaster, among others.
Each has its strengths and weaknesses, so it’s critical to choose one that is suitable for your specific situation. If you’re repairing drywall cracks in corners that are less than a quarter-inch wide, spackling paste or joint compound might be suitable because they dry quickly and can be easily sanded down afterward.
In contrast, if you’re dealing with larger cracks or structural damage from corner cracks, you’ll need a stronger filling material, such as patching plaster. When deciding which material to use when fixing cracks in drywall corners, always check with your local hardware store professionals for their recommendations based on your project’s needs.
Applying Filling Material to Crack: A Delicate Process
Once you’ve selected an appropriate filling material for restoring cracks in drywall corners, it’s time to apply it correctly. Begin by using a putty knife or scraper to spread the filler into the crack gradually. Make sure there are no air pockets or gaps left behind, as this may weaken the repair over time.
Feather out both sides of the crack with diagonal strokes using a wider blade (6″-10″). Always check that both sides of the wall have even levels before smoothing out any excess filling material.
Remember: Don’t overfill! It’s better to under-fill slightly and then add more layers of the compound than using too much filler at once.
Allow sufficient time for drying (usually 24-48 hours) before sanding or painting over patched surfaces: Picking up proper equipment such as scrapers and putty knives, some filling materials, and following these tips will guarantee satisfactory results after filling cracks in inside corners.
Sanding and Smoothing
Sanding Down Excess Filling Material: A Necessary Evil
Patching cracks in corner walls can be a real hassle. But even though filling cracks in inside corners can be a tedious job, it is the sanding part that really makes me want to pull my hair out!
Sanding down excess filling material is a necessary evil, but it doesn’t have to be painful if you use the right technique. First off, choose the right type of sandpaper for the job.
Fine-grit sandpaper (around 120 grit) is great for smoothing down rough patches without removing too much material. Use a sanding block or pad to help keep the sandpaper flat against the wall and avoid creating more uneven spots.
When you’re ready to start sanding, work from the edges of the repair towards the center, using light pressure and circular motions. This ensures that you don’t accidentally smooth out your repair when trying to get rid of excess material.
Once most of the excess material has been sanded off, switch to the even finer grit (around 220 grit) and continue smoothing until you achieve your desired finish. Remember not to overdo it – too much sanding can damage surrounding drywall or create new problems like dips or bumps in your repair.
Ensuring a Smooth Finish: The Final Touch
Paint touch-ups after repairing drywall cracks may seem like a daunting task, but with some know-how, you can make sure your repairs blend seamlessly with their surroundings. Filling cracks in inside corners is just one step – ensuring a smooth finish is where your hard work really pays off.
Before painting or finishing your repair with texture spray, make sure all rough patches have been sanded down smoothly, as described above. Then take some time to carefully match the paint color or texture to the existing wall surface.
If you’re painting, try to use the same type of roller or brush strokes as were used in the original paint job. This can help blend your new coat of paint into the existing paintwork, so that your repair is barely noticeable.
If you’re applying texture spray, make sure to test a small area first and adjust the nozzle until you achieve a similar texture as the surrounding wall. Then apply your final coat in a light, even layer for best results.
Remember – patience is key when it comes to restoring cracks in drywall corners. The steps for repairing corner cracks in drywall are quite simple, but taking your time and doing things right will result in professional-looking repairs that stand up to scrutiny.
Painting or Finishing Touches
Matching paint color or texture to the existing wall surface
Now that the hard part is done — filling and sanding the cracks in your drywall corners — it’s time for the fun part: painting! But don’t let this step be an afterthought. The last thing you want is a glaringly obvious patch on your wall where a crack used to be.
To ensure a seamless finish, you’ll need to take extra care when matching the paint color or texture of your existing wall surface. First, take note of the paint color and finish (i.e., matte, eggshell, satin, etc.) of your walls.
This will help you narrow down potential options at the hardware store. However, keep in mind that even if you purchase the same exact paint brand and color as what’s currently on your walls, there may still be slight variations due to factors such as age and wear.
If possible, bring a small scrap of drywall from an inconspicuous spot in your home (such as inside a closet) to use as a reference for matching purposes. If you’re unable to obtain a sample piece of drywall, consider bringing in photos of your walls instead.
Applying a final coat of paint or texture
Now that you’ve found the right match for your wall’s color and texture, it’s time to apply the final coat of paint or texture. As always, with painting projects, prep work is key.
Be sure to cover any surrounding areas with drop cloths or painter’s tape before applying any paint. If you’re working with textured walls (such as popcorn ceilings), there are several techniques you can use to recreate this look over patched-up drywall corners.
One option is using a spray can texture (also known as “popcorn” spray), which can be found at any hardware store. Simply shake the can and then spray it over the patched area in a sweeping motion.
If you’re working with flat walls, apply a coat of primer to the patched area before painting. This will ensure that the paint adheres properly and appears even in color.
Preventative Measures
Tips for Preventing Future Cracks in Drywall Corners
So you’ve repaired your drywall corner cracks, now what? Don’t let all that hard work go to waste by failing to take proper preventative measures.
The truth is, repairing cracks in corners is only half the battle. The other half involves preventing future cracks from forming.
Here are some tips that will help you avoid repeating the same mistakes: Firstly, avoid applying too much pressure when painting or hanging anything on a wall corner.
This is often a common cause of drywall corner cracks. You might think you’re just putting up a simple picture frame, but every hole you drill or nail you hammer can increase the risk of cracking.
Another important tip is to make sure that your home’s foundation and framing are stable and level. Structural issues can lead to cracking in drywall corners over time, so it’s important to address these problems before they become worse.
Keep an eye on humidity levels in your home and maintain them at optimal levels (between 30-50%). Dry air can suck moisture out of walls, causing them to shrink and crack over time.
Importance of Regular Maintenance
Let’s be real – preventative measures can only go so far. Even with all the care in the world, sometimes drywall corners will still crack over time.
That’s why regular maintenance is crucial! Don’t wait until those small cracks turn into big problems before addressing them.
Here are some best practices for maintaining your walls: Regularly inspect your walls for any signs of damage or wear and tear; don’t just focus on corners!
Small issues like water stains or dents can eventually lead to larger problems. Touch up paint after repairing drywall cracks – even if it seems like an unnecessary step because it doesn’t affect the structural integrity of the wall.
A fresh coat of paint can help prevent moisture from penetrating the wall and causing future damage. Be sure to hire a professional if you’re unsure about how to perform any repairs or maintenance yourself.
It’s better to pay for an expert than risk making things worse. Remember, proper maintenance and preventative measures can help extend the lifespan of your walls and keep them looking great for years to come.
Frequently Asked Questions
Are cracks in wall corners normal?
Cracks in wall corners are relatively common and can occur due to the natural settling of the building, temperature and humidity fluctuations, or improper installation of drywall. However, it’s important to assess the severity and patterns of the cracks to determine if further investigation or repairs are necessary.
What causes cracked corners?
Cracked corners in drywall can be caused by various factors, including structural movement, settling of the building, poor installation techniques, moisture or water damage, or insufficiently flexible joint compound or drywall tape. Identifying the underlying cause is crucial for determining the appropriate repair approach.
Can you just paint over drywall cracks?
While it may be tempting to paint over drywall cracks, simply applying paint is not a sufficient solution. It is essential to address the underlying cause of the cracks, properly repair the damaged area using joint compound or drywall mud, and ensure a smooth and seamless finish before painting.
How do you know if cracks are serious?
Cracks in walls can vary in seriousness, but certain signs indicate more severe issues, such as cracks wider than 1/8 inch, diagonal or stair-step cracks, uneven or bulging walls, or cracks accompanied by other structural issues like foundation movement. Consulting a professional for a thorough evaluation is recommended for determining the severity of the cracks.
What are the dangers of wall cracks?
Wall cracks can indicate potential structural problems, such as foundation issues or excessive structural movement, which may compromise the stability and safety of the building. In some cases, these cracks can also allow moisture infiltration, leading to mold growth or further damage if left unaddressed.
Why are the corners of my drywall cracking?
Drywall corners can crack due to factors such as settling of the building, improper installation of corner beads or tape, structural movement, or insufficiently flexible joint compound. Identifying the root cause is essential to effectively repair the cracks and prevent their recurrence.
Conclusion
Techniques to repair cracks in inside corners are vital to maintaining the integrity of your home. Drywall cracks at wall corners may seem like a small issue, but they can become a much bigger problem if left untreated. That’s why it’s essential to know how to repair drywall cracks in corners before they lead to structural damage or extensive repairs.
Repairing tape joints in corner walls is a time-consuming process, but it is well worth the effort. By following best practices for fixing cracks in drywall corners and taking steps for repairing corner cracks in drywall, you can prevent future damage and ensure the longevity of your home’s walls.
Patching and sanding corner cracks may seem daunting at first, but with some patience and persistence, you can achieve excellent results. DIY corner drywall crack repair is possible with the right tools and materials at hand.