The ceiling is often overlooked when it comes to home maintenance, but it plays an important role in keeping your home safe and comfortable. It provides insulation, helps regulate temperature, and keeps out unwanted pests.
A well-maintained ceiling can also add to the aesthetic appeal of your home. Unfortunately, many homeowners neglect their ceilings until there is a problem.
This can lead to more significant issues down the road that are costly and time-consuming to fix. That’s why it’s crucial to keep an eye on your ceiling and address any problems as soon as they arise.
In this article, learn how to repair loose drywall tape on ceiling to maintain a well-maintained home.
The problem of loose drywall tape on ceilings
One common issue that homeowners face with their ceilings is loose drywall tape. This problem occurs when the tape used to cover joints between pieces of drywall becomes detached from the surface, leaving unattractive gaps or even peeling off entirely.
Not only does this look unsightly, but it also compromises the integrity of your ceiling. Loose drywall tape can indicate underlying structural damage that needs attention before more extensive repairs are necessary.
Don’t let loose drywall tape go unnoticed, or try to cover it up with a quick coat of paint – this issue requires a bit more effort than that! In this article, we’ll provide tips for reattaching loose drywall tape on the ceiling and give you the best practices for fixing this pesky problem once and for all.
How To Repair Loose Drywall Tape On Ceiling: Tips for Reattaching Loose Drywall Tape
Before you start repairing loose drywall tape on your ceiling, make sure you have all the necessary tools and materials at hand – we’ll get into those later! You’ll also need some patience and attention to detail since this repair requires precision work.
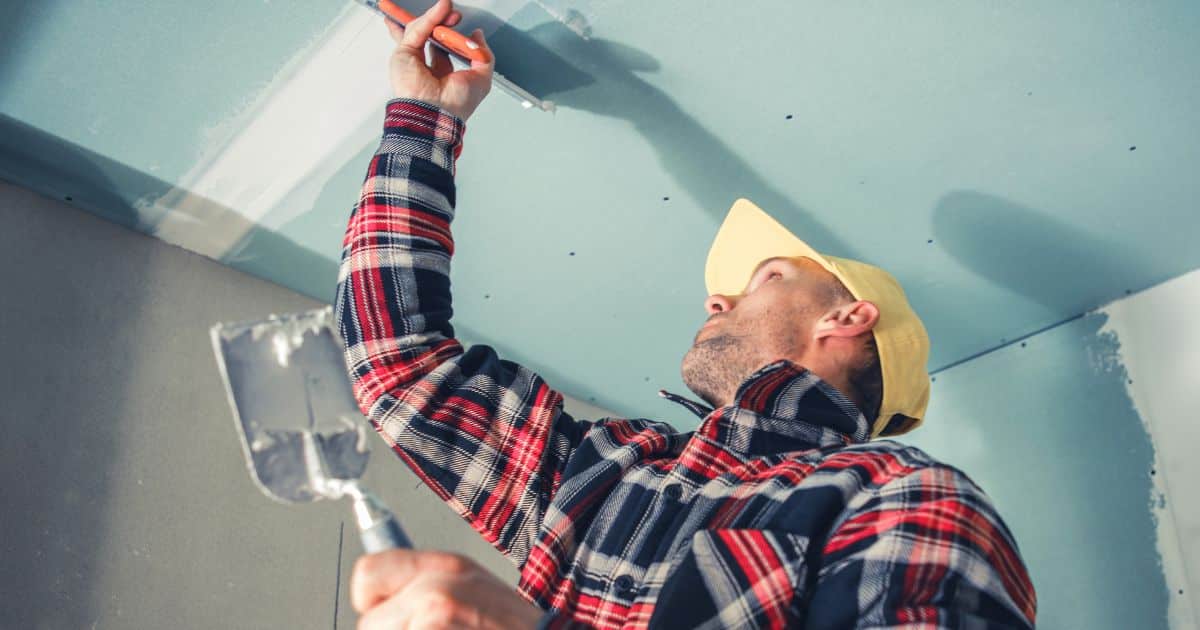
Begin by removing any loose drywall tape edges on the ceiling. Use a scraper to remove any peeling or cracked tape carefully.
Be sure to get rid of any debris or dust that has accumulated around the damaged area. Once you’ve cleaned up the area, sand down any rough spots around the edges of where the tape was removed.
This will help create a smooth surface for mudding and taping ceiling joints. Now it’s time for mudding and taping ceiling joints.
Apply a thin layer of joint compound with a putty knife over where the old drywall tape was located. Lay mesh drywall tape over this layer, smoothing it out as you go along to avoid air pockets or wrinkles.
Use your putty knife to apply another thin layer of joint compound over the tape, making sure it is evenly distributed. Once this layer is dry (usually takes 24 hours), you can apply additional coats until you have achieved a flat and even surface.
Paint Touch-Up After Repairing Drywall Tape
Once your repair is complete, you’ll need to do some sanding and finishing ceiling drywall repairs. Sand down any rough patches until everything feels smooth beneath your fingertips, making sure not to overspend areas surrounding your repair work.
After sanding, wipe down everything with a damp cloth before applying paint touch-up after repairing the drywall tape. Make sure to let each coat of paint fully dry before applying another one – this could take several days, depending on how many layers are necessary for adequate coverage.
Repairing peeling drywall tape can be frustrating, but taking these steps will ensure that your ceilings look great once more without compromising their structural integrity. Remember always to take care when restoring loose drywall tape on the ceiling – doing so will save time and money in repairs down the road!
Understanding Loose Drywall Tape
What is drywall tape, and why is it important?
Let’s start with the basics. Drywall tape, also known as joint tape, is a thin paper or fiberglass tape used to cover seams between sheets of drywall and create a smooth surface for finishing. Without proper taping, your drywall joints would be rough and uneven, making it difficult to achieve a professional finish.
Common causes of loose drywall tape on ceilings
Now that we know what drywall tape is and its purpose, let’s delve into why the hell it keeps coming loose! The reasons for this are many: poor installation job – perhaps during initial construction or previous repair work. Other possible causes include temperature changes (we’re looking at you, extreme hot and cold), moisture damage from leaks or humidity build-up, inadequate mudding or taping (meaning there is not enough adhesive to keep the drywall and/or joint tape in place), age-related wear and tear, house settling…the list goes on!
Tips for reattaching loose drywall tape on the ceiling: First things first: before attempting to reattach loose drywall tape, you need to identify the cause of the problem.
Is it an isolated spot, or are there multiple areas where the tape has come undone? Has there been any water damage?
Once you’ve assessed what’s going on behind-the-scenes so-to-speak – then you can plan your patching strategy. Applying new drywall tape on the ceiling:
If only a small section of your ceiling has come undone – no bigger than, say, 6 inches long – then applying a new joint compound may do the trick. However, if multiple areas are affected by sagging/peeling/bubbling/wrinkling/cracking/etc., then you’ll need to remove any old damaged parts before applying fresh joint compound and new tape.
Steps to repair loose drywall tape on the ceiling: To repair loose drywall tape on the ceiling, start by removing any loose or damaged parts.
Then, apply a thin layer of joint compound (also known as mud) over the seam – making sure to cover it completely. After that, take your new length of drywall tape and press it onto the joint compound, smoothing it down as you go.
Once this is done, apply another thin layer of joint compound over the top of the tape to create a smooth finish. Patching loose drywall tape on the ceiling:
If there’s been water damage or other significant structural issues causing areas of your ceiling’s drywall to buckle or sag – then you’ll need to patch up these areas before reattaching any loose sections of tape. To do this, you’ll need to cut out any damaged pieces and replace them with new ones before attempting to reattach any loose sections.
Techniques to repair ceiling tape joints: When repairing a ceiling with pre-existing taped joints it is essential that you first remove any old adhesive that may have disintegrated.
Once this has been done, use a paint scraper or sandpaper to ensure there are no bumps or ridges around where your new joint will be applied. After applying fresh adhesive, you can set in place your newly cut piece of joint material, which should fit snugly into place with no air pockets or gaps.
Sanding and finishing ceiling drywall repairs: Once all patches have been made and allowed time for drying (typically 24 hours), gently sand down any rough spots using fine-grit sandpaper until smooth.
If necessary, add another coat of joint compound – but remember not too much, as over-mudding can lead to problematic bubbles – which will require even more repairs! Best practices for fixing loose drywall tape on the ceiling:
The key takeaway here is always to make sure you know what’s behind the tape – if it’s moisture-related, ensure that the source of the problem is fixed before attempting to reattach any loose sections. Good prep work and attention to detail will ensure that your fixing attempts won’t be wasted.
Mudding and taping ceiling joints: When mudding and taping your ceiling joints, use a wide putty knife for your first coat of mud.
This will ensure a smooth surface from the beginning which is essential for ensuring that your joint tape lays flat against the ceiling without any air bubbles or ridges. To apply your tape, use either fiberglass or paper-thin strips of tape, making sure to press them firmly into place with no gaps.
Fixing loose drywall on your ceiling can be accomplished by taking a few simple steps to first identify and then patch up any problem areas. By following our tips, you should find yourself with a smooth, professionally finished ceiling in no time!
Tools and Materials Needed for Repair
List all necessary tools and materials needed for the repair process
To fix drywall tape peeling on the ceiling, repair peeling drywall tape, or restore loose drywall tape on the ceiling, you’ll need several tools and materials. Here’s a comprehensive list of what you’ll need:
1. Joint compound: Joint compound is used to fill in the gaps between loose drywall tape edges on the ceiling. Be sure to purchase enough for your project size.
2. Putty knife: A putty knife is used to apply joint compound.
3. Drywall Tape: Applying new drywall tape on the ceiling might be necessary if the old one is beyond repair.
4. Sandpaper: Sanding and finishing ceiling drywall repairs are essential to achieving a smooth surface after repairing peeling drywall tape.
5. Utility knife or scissors: To cut and trim new pieces of drywall tape or cut away any damaged sections around loose drywall tape edges on the ceiling.
6. Drop cloth or plastic sheeting: To protect your floors from any debris that may fall during your DIY ceiling repair project.
7. Water Bucket & Sponge: You’ll need water to clean up any visible debris before starting your next step of mudding and taping ceiling joints 8. Paintbrush & matching paint color: Paint touch-up after repairing drywall tape is an excellent idea as it will help blend in with existing colors seamlessly
Provide tips on where to purchase these items
Although some people might have some of these tools lying around their homes, others will need to buy them before they start their DIY fixing loose drywall project. Local hardware stores like Home Depot, Lowe’s, Menards, and Ace Hardware can be an excellent places for purchasing all necessary supplies like joint compound, putty knives, sandpaper, utility knives, and paintbrushes.
Make sure to check out online options like Amazon or Walmart for a wide range of products and affordable prices as well. A word of caution, however: don’t skimp on the quality of your materials.
Cheap tools and materials can result in poor-quality workmanship or even make the problem worse in some cases. Stick with reputable brands and good-quality equipment to ensure a successful project that lasts for years to come.
Preparing the Ceiling for Repair
How to properly prepare the area around the damaged tape
Before you can start repairing peeling drywall tape on your ceiling, it’s essential to prepare the area around the damage. Proper preparation ensures that your repair will look seamless and blend in with the rest of your ceiling. First things first: gather all the necessary tools and materials you’ll need for this DIY ceiling drywall tape repair project.
You’ll need sandpaper, a putty knife, a utility knife, joint compound, paint, primer, and drywall tape – if you’re replacing it altogether. Next up is safety precautions; we cannot stress enough how important this step is!
Ensure that there are no sharp objects lying on the ground that can cause injury during the process of fixing loose drywall tape on the ceiling. Be sure to wear gloves and goggles before starting any work- these will protect your skin and eyes from any debris or dust particles.
Now that you’ve cleared out all obstructions and are safely geared up let’s move on to preparing your work surface for repair. In order to accomplish this step effectively:
• Use a utility knife to carefully cut away any damaged or peeling portions of your loose drywall tape edges on the ceiling. • Sand down any rough spots in preparation for mudding and taping ceiling joints.
Safety precautions should be taken before starting any repair work
Safety is paramount when working with power tools or performing home repairs such as repairing peeling drywall tape. As we mentioned earlier while discussing preparing our workspace/area for repair- make sure there are no sharp objects lying around and wear gloves & goggles throughout! Since we’ll be using joint compounds when restoring loose drywall tape on ceilings, ensure proper ventilation throughout the space by opening windows or doors if possible.
Also, consider wearing a dust mask to protect yourself from inhaling any dust particles that may arise during sanding or mudding and taping ceiling joints. Last but not least, don’t forget to turn off the power supply to the room in which you’re working.
This is critical since we will be using sharp tools, and any accidental contact can result in electrocution and serious injury. Besides- it’s better to be safe than sorry!
Before you can start repairing peeling drywall tape on your ceiling, there are certain precautions one must take into account. Gather all tools and materials required for the job beforehand, making sure there are no sharp objects remaining on surfaces that may cause injury during the process of fixing loose drywall tape on the ceiling.
Proper ventilation throughout the space ensures that there won’t be any issues with the inhalation of dust particles while sanding or mudding and taping ceiling joints. Don’t forget to turn off the power supply to your working area since we’ll be using sharp tools, and accidental contact can result in electrocution or serious injury!
Repairing Loose Drywall Tape – Techniques to repair ceiling tape joints
After identifying the loose drywall tape on your ceiling, it’s time to get down to business and fix the problem once and for all. The first step is gathering all of the necessary tools and materials, which were discussed in detail in a previous section of this article.
Once you have everything you need, it’s time to start restoring loose drywall tape on the ceiling. The first step is inspecting the damaged area and removing any loose pieces of drywall tape that may be curling or peeling away from the surface.
After you have done that, it’s time for mudding and taping ceiling joints. Apply a layer of joint compound over the entire area where you’ve removed drywall tape with your putty knife.
Then carefully place a new strip of drywall tape over this joint compound using light pressure with your fingers. Once you’ve applied new drywall tape on the ceiling, use a 6-inch knife to smooth out any rough spots or bubbles in the joint compound by running it along the length of the taped seam.
Always sand off any excess material after allowing it to completely dry. Remember, patience is key when repairing loose drywall tape on ceilings.
Applying Joint Compound – Steps to repair loose drywall tape on the ceiling
The next step in repairing loose drywall tape on ceilings is applying joint compound properly. Make sure that when applying joint compound over new strips of drywall, it covers everything evenly without leaving any areas exposed or covered too thickly, which will make for more work later. When taping corners or seams between two walls or ceilings, make sure not only do we put enough mud behind them but take our 6-inch trowel and slightly feather them out towards both surfaces, then let them fully cure before adding another coat if needed.
It’s important to note that if you have any troubles with bubbled or cracked ceiling tape, do not attempt to cover it up with additional layers of joint compound. This will only exacerbate the problem, requiring complete removal and replacement of the affected area.
Smoothing out Rough Spots and Edges – Best practices for fixing loose drywall tape on the ceiling
As you begin smoothing out rough spots or edges in your joint compound, take your time and work slowly. Use a putty knife or taping knife to smooth out any areas that may be too thick or uneven. It’s also a good idea to use a damp sponge to smooth out any edges that may be sharp or uneven after applying new drywall tape on the ceiling.
When sanding off excess material after allowing it to fully cure, make sure it is done in small increments so as not to damage surrounding surfaces. When repairing drywall tape on ceilings, there’s no need for perfection, but take pride in your work, as it will always show.
Paint Touch-up – Best practices for fixing loose drywall tape on the ceiling
After you’ve finished repairing loose drywall tape on ceilings, it’s time for a paint touch-up. Make sure all areas are completely clean and free from dust before applying any paint.
Using a primer can help even out differences between new joints and old work which can alleviate issues with flashing which can occur if not blended correctly. Once primed and then painted, make sure everything matches at this point.
Finishing Touches
Sanding: The Finesse Stage of the Ceiling Drywall Tape Repair
Congrats! You’re almost done with patching loose drywall tape on the ceiling. Now, it’s time to sand down any rough spots after applying the joint compound.
This step is crucial to ensure that the surface is smooth even before you paint or retexture the area. But be warned: sanding is not a brute-force task.
It requires finesse, patience, and attention to detail. Over-sanding a spot can leave it too thin or uneven, while under-sanding can leave ridges in your patch job.
So, what’s the best technique for sanding? The answer is gentle circular motions with fine-grit sandpaper (around 120 grit).
Start with lighter pressure and gradually increase as needed until you reach the desired smoothness. Be sure to use a dry cloth to wipe away the dust before proceeding to paint touch-up after repairing drywall tape.
Paint Touch-Up: Blending Your Repair Into Your Ceiling
Got your ceiling look smooth as silk? Great!
But before you call it a day, let’s talk about paint touch-ups after repairing drywall tape. First things first, ensure that your joint compound has dried completely before you start painting – usually 24 hours but check the manufacturer’s instructions just in case.
Then grab some primer and give your repair job a coat or two – this helps conceal any blemishes left over from mudding and taping ceiling joints. Next up: Blend in your new repair with the rest of your ceiling using color-matching paint.
It may take some sleuthing on your part if you don’t have any leftover paint or don’t know exactly what shade was used originally on that section of the ceiling. But once you’ve got an idea of the right color, feather it in with a soft-bristle brush or roller until you achieve a seamless transition from old to new.
Texturing: Adding Character to Your Ceiling
While you’re at it, why not try your hand at adding some texture? This is an optional step but can add some character to your restored ceiling.
There are a variety of texturing techniques, such as stippling or popcorn effect, but ensure that they match the original texturing as closely as possible. Otherwise, you run the risk of making your repair stand out like a sore thumb.
If you’re feeling adventurous and want to try something new, consider using a drywall texture roller or spray gun. But be warned – these tools require experience and practice before being able to master them well enough for this task.
The Bottom Line: Take Your Time
Take it from me: patching loose drywall tape on the ceiling is one of those tasks that can quickly turn into a nightmare if done haphazardly. Taking extra time and care during each stage of repairing loose drywall tape on the ceiling- preparation, mudding, and taping ceiling joints sanding, and finishing- is key.
With patience and attention to detail, anyone can restore loose drywall tape edges on the ceiling back to their original glory. Just remember: slow and steady wins the race!
Frequently Asked Questions
Can loose drywall tape be glued?
Loose drywall tape should not be glued as a long-term solution. It is recommended to remove the loose tape, repair the underlying issue, and properly reattach or replace the tape using joint compound or drywall mud.
What causes drywall tape to come loose?
Drywall tape can come loose due to various reasons, including poor installation, insufficient application of joint compound, humidity or moisture issues, structural movement or settling, or the natural aging of the tape and adhesive over time.
Can you paint over drywall tape?
You can paint over drywall tape. However, it is essential to ensure that the tape is firmly adhered to the wall or ceiling before painting. If the tape is loose or damaged, it is advisable to repair or replace it before painting.
Why is ceiling tape peeling?
Ceiling tape can peel due to water damage, moisture issues, improper installation, or temperature fluctuations. Additionally, inadequate adhesion between the tape and the underlying surface or the use of low-quality materials can contribute to tape peeling on the ceiling.
What causes drywall tape to come loose?
Drywall tape can come loose due to various reasons, including poor installation, insufficient application of joint compound, humidity or moisture issues, structural movement or settling, or the natural aging of the tape and adhesive over time.
Can I put tape on a ceiling leak?
Applying drywall tape over a ceiling leak is not a recommended solution. It is crucial to address the source of the leak, repair the damaged area, and ensure it is properly dried before applying new tape or making any necessary repairs. Simply covering the leak with tape will not address the underlying issue and may lead to further damage.
Conclusion
Recap: Mudding and taping ceiling joints is a tedious process that can make even the most experienced DIYers cringe. Nevertheless, it’s essential to take care of your ceiling by repairing peeling or loose drywall tape as soon as possible.
Throughout this article, we’ve explored steps to repair loose drywall tape on the ceiling, including how to reattach drywall tape and tips for fixing loose edges.
The Importance of Care: Taking care when repairing your ceiling is crucial if you want your repairs to last.
One of the main reasons why loose or peeling drywall tape happens is improper installation or hasty repair work. To avoid this, always take your time when applying joint compound and reattaching new tape.
Pay attention to detail and ensure that everything is smooth before moving on to the next step.
Proper Preparation: Proper preparation for any DIY project is essential, but it’s especially important when it comes to repairing loose drywall tape on ceilings.
Before beginning any repairs, be sure that you have all the necessary tools and materials ready at hand. Additionally, take safety precautions seriously by wearing protective gear such as safety goggles and gloves.
The Right Tools: Having the right tools for the job can make all the difference when it comes to repairing ceiling drywall tape properly. Investing in high-quality joint knives and putty knives will make a world of difference in achieving smooth finishes while sanding down rough areas after applying joint compound.
An Attentive Mindset: Attention is key when repairing loose drywall tape on your ceiling. As mentioned earlier, taking care of every step will ensure that repairs are durable enough to last for years without needing further attention from you or a professional contractor.
Fixing loose drywall tape on your ceiling may seem like a daunting task, but with proper preparation, tools, materials, and attention to detail, anyone can successfully complete this project. Applying new drywall tape on the ceiling or repairing bubbling tape joints is not something to be scared of if you approach it with patience and care.
Remember to take safety precautions seriously, invest in good quality tools for the job, and always take your time when making repairs. You got this!
